Capture and Convert Website Visitors
 Converge Team
Every website visitor is a potential customer. Leads helps you identify, score, and nurture these prospects before they slip away. In the next 8 minutes, you'll learn how to capture leads from your chat widget, understand their intent, and convert them into paying customers.
What Are Leads?
When someone visits your website and interacts with your chat widget, Converge automatically creates a lead record. Unlike customers who reach out through WhatsApp, Telegram, or other platforms, leads are anonymous website visitors who haven't yet revealed their identity—but their behavior tells a story.
Don't need a leads pipeline? Then there's nothing to configure. A tracked visitor stays in the Leads view only until the first message exists—after that they move to your Inbox on their own, whether they wrote to you or one of your agents wrote to them first.
Automatic Capture
Every visitor who lands on your site with the chat widget installed is tracked automatically. No forms required—just install the widget and start capturing.
Rich Context
See which page they came from, their UTM parameters, referrer, timezone, device, and more. Know exactly how they found you.
Intelligent Scoring
Each lead gets a quality score (0-100) based on their behavior and profile. Focus your energy on the hottest prospects.
Leads vs. Contacts
There is one line that matters, and it's whether a message exists. Everything a visitor did before that first message is context; the message itself is what changes where they live in the app.
Leads — tracked, never messaged
The widget saw them, so you have their source page, referrer, campaign parameters and a lead score. Nobody has written anything yet, in either direction. They get an auto-generated name and avatar, and they stay in the Leads view.
Contacts — at least one message exists
They wrote to you, or an agent or automation wrote to them. Either way they leave the Leads view immediately and appear in your Inbox, or in Resolved once the conversation is closed. Their lead score and attribution data travel with them.
The move happens on the first message and needs no approval step. A visitor you cold-message from the Leads view is a contact from that moment on, exactly like one who opened the chat themselves.
How Lead Scoring Works
Every lead receives a quality score from 0 to 100. This score updates automatically as Converge learns more about the visitor. Higher scores mean higher intent—these are your hottest prospects.
The score reads behavior and identity, not position in a pipeline. Moving to your Inbox never changes it, and a lead who is still browsing can outscore one you already replied to.
What affects the score?
| Signal | Impact |
|---|---|
| Visited /pricing, /demo, or /book page | High |
| Came from paid ads (Google, LinkedIn) | High |
| Left an email address in the widget | High |
| Reached from ProductHunt or LinkedIn | Medium |
| Has UTM tracking parameters | Medium |
| External referrer (not your site) | Medium |
| Timezone and country detected | Low |
Viewing and Managing Leads
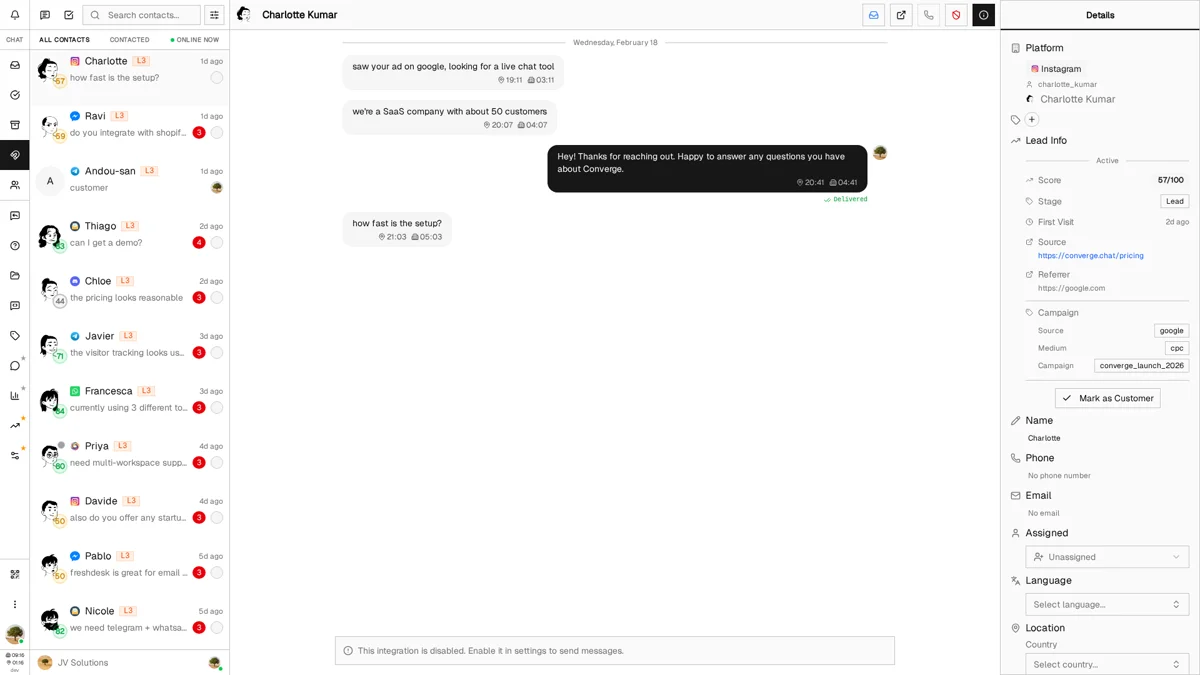
Access your leads by clicking the Magnet icon in the sidebar. This opens a dedicated view showing only website visitors—separate from your other inbox conversations.
The leads list
Anonymous visitors get fun, auto-generated names (like "Purple Tiger") and colorful avatars. This helps you distinguish between visitors before they identify themselves.
A dot on the avatar shows whether the visitor is on your site right now. Green means they're reading a page as you look at the row.
Where a contact's last message would sit, a lead shows the site they were captured on—context before you open the conversation.
A thin vertical bar to the left of the avatar fills in proportion to the score and is color-coded by warmth. Hover it to read the exact number out of 100.
Quick filter toggle
At the top of the leads list sits a two-way toggle: All contacts and Online now. The second tab carries a live count and narrows the list to visitors currently on your site, sorting them to the top. Catching someone while they're still reading your pricing page is the whole point of the Leads view.
Filtering your leads
Click the filter icon in the list header to narrow down by:
- Assignment — All, assigned to me, or unassigned
- Priority — Urgent, high, normal, or low
- Tags — Filter by any tags you've applied
Lead Details and Attribution
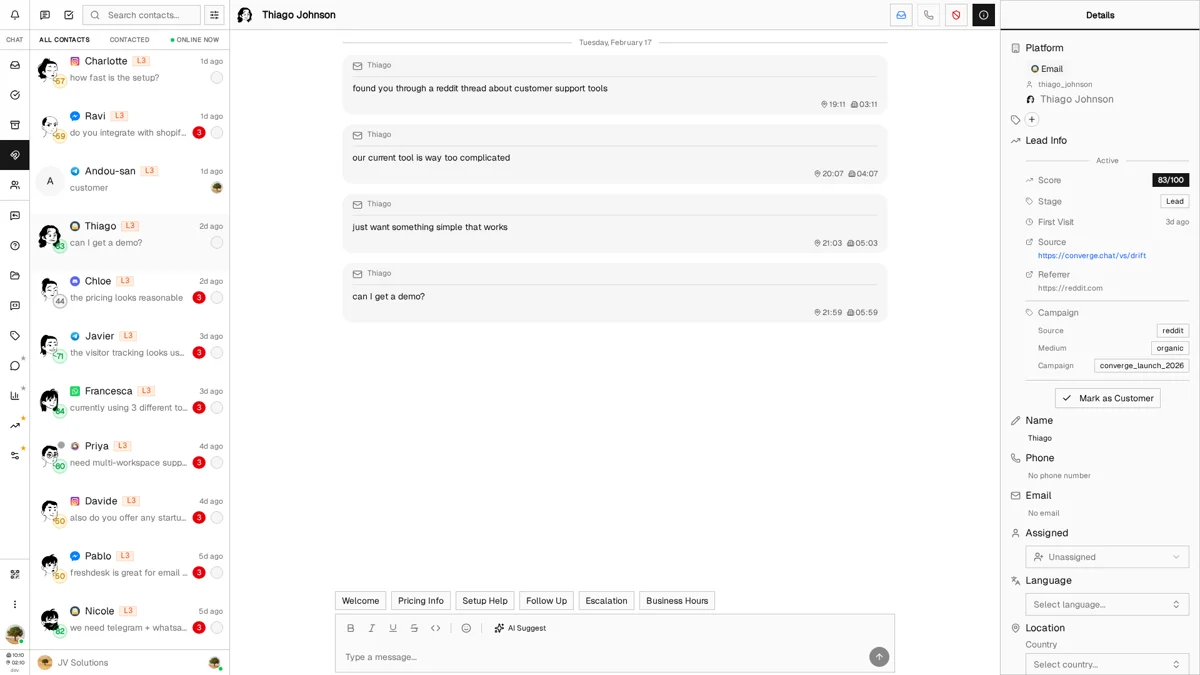
Click any lead to open their profile. The right sidebar shows everything Converge knows about this visitor, including powerful attribution data for understanding their journey.
Attribution data
The exact URL where this visitor first interacted with your widget. "/pricing" vs "/blog" tells very different stories.
Where they came from before landing on your site. Google search? LinkedIn post? A competitor's blog?
Full UTM breakdown: source, medium, campaign, content, and term. Perfect for tracking which campaigns drive conversions.
Other lead information
- Timezone & Local Time — Know what time it is for them before reaching out
- Device & Browser — Desktop, mobile, or tablet? Chrome or Safari?
- First Visit — When they first appeared on your site
Converting Leads to Customers
Most of the time you never touch this. The first message moves a lead into your Inbox on its own, so the manual button is for the case where no message exists yet and you still want them out of the Leads view—a walk-in who bought over the phone, or a visitor you've been working by email.
You usually don't need this: messaging a lead from the Leads view already moves them to your Inbox. Reach for Mark as Customer only when you want the move without sending anything.
How to convert a lead
-
1
Open the lead's profile
Click on the lead in your leads list to open their conversation and profile sidebar.
-
2
Open the Activity tab
In the right sidebar, switch to Activity. The Lead Info block sits at the top, above the session and page-view stats.
-
3
Click "Mark as Customer"
At the bottom of the Lead Info section, click the button to convert them.
-
4
Confirm the conversion
A dialog asks you to confirm. Once you do, the app drops you into their conversation in the Inbox.
Lead Retention Settings
Admin / Owner OnlyVisitors who never messaged and never left a way to reach them are cleaned up after a retention period. This keeps your leads list focused on real prospects.
Configure this in ManageVisitors. Choose how long to keep inactive visitors:
- 1 day — Aggressive cleanup for high-traffic sites
- 7 days — Balance between cleanup and opportunity
- 14 days — Give visitors more time to return
- 30 days — Maximum retention for lower-traffic sites
Note: Cleanup asks whether you can still act on the row, not how long it sat there. A stale visitor is deleted only if they are still fully anonymous—no email, no phone number, and nothing beyond the placeholder name the widget generated. Leave any one of those behind and the record is kept for good, whatever the retention window says. Contacts who have exchanged a message are never touched, and scraper traffic is always removed once stale.
Best Practices & Tips
Prioritize by score
Focus on leads with scores of 70+ first. These visitors have shown strong buying signals—they visited pricing pages, came from paid ads, or provided their information.
Use tags for segmentation
Tag leads based on their source page or campaign. "Pricing Visitors" and "Blog Readers" require very different follow-up approaches.
Check attribution before reaching out
Know which page they came from and what referred them. A personalized "I noticed you were looking at our enterprise plan" beats a generic greeting.
Respect timezones
The lead's local time is shown in their profile. Don't message someone at 3 AM their time—schedule your outreach for their business hours.
Assign hot leads immediately
When a high-score lead appears, assign them to a team member right away. Speed matters—the faster you respond, the higher your conversion rate.
What's Next?
You're now equipped to capture and convert website visitors. Here are some related features to explore:
- Replies Guide — Set up auto-replies to engage leads instantly
- Tags — Organize leads for targeted follow-up
- Widget Settings — Customize your chat widget to capture more leads
Need more help?
Our support team is here for you. Click the chat widget in the bottom right corner to start a conversation.
We typically respond within minutes during business hours.